An agent in Opperator is a Python program that runs locally on your computer and comes with the Opperator SDK: a framework that handles all the infrastructure so you can focus on your agent’s logic. The SDK handles all the heavy lifting: process management, LLM integration, secrets storage, status displays, and system communication. You write the core logic, and the SDK takes care of the rest.Documentation Index
Fetch the complete documentation index at: https://docs.opper.ai/llms.txt
Use this file to discover all available pages before exploring further.
What the SDK Provides
The Opperator SDK automatically handles:- Running your agent reliably in the background
- Letting the LLM call your agent’s commands
- Storing and retrieving secrets securely
- Showing status and information in Opperator’s interface
- Communicating with the Opperator system
Before You Build
Preparation makes a big difference. Take a moment to think through your agent’s purpose before building:- APIs and services - What external services or APIs will your agent need to connect to? Think about authentication, rate limits, and API keys you’ll need.
- Frequency and triggers - How often should your agent run? Will it be on-demand, scheduled at intervals, or continuously monitoring for events?
- Data and display - What information should the agent display or log? What metrics matter to you? What do you want to see in the status sidebar?
- Commands and actions - What specific commands or actions should users be able to trigger? What are the core functions your agent needs to perform?
Creating Your Agent
The quickest way to create an agent is through the Opperator TUI using the Builder agent.Switch to the Builder agent
Press
Shift+Tab to toggle between agents, or type /agent builder in the chat.Describe your agent
In the chat, tell the Builder what you want to create. Be specific about what the agent should do:
The Builder works its magic
The Builder agent will work interactively to create your agent:
- Gather requirements - Asks clarifying questions to understand your needs
- Bootstrap the agent - Sets up the complete agent structure:
- Agent directory at
~/.config/opperator/agents/{agent-name}/ - Python virtual environment
- Opperator SDK integration
- Agent registry entry
- Agent directory at
- Implement with progress - Builds your agent in real-time, testing commands as it goes
- Hand off - Delivers a ready-to-use agent
Building Agents from the CLI
If you prefer coding in your own editor, you can create agents using the CLI bootstrap command:agents.yaml registration. Then you can implement your agent’s logic in Cursor, Claude Code, VS Code, Vim, or whatever editor you prefer.
Your agent lives in ~/.config/opperator/agents/{agent-name}/, so you have full access to all the files.
For a complete CLI workflow example, see the Sora video creator agent guide.
Using Your Agent
Once your agent is running, you can test and debug it directly from the Opperator TUI. PressShift+Tab to toggle between agents. The agent name is displayed in the interface so you always know which agent you’re interacting with.
Calling Your Agent’s Commands
You can interact with your agent in two ways:- Direct Prompts
- / Slash Commands
Just ask your agent to do something in natural language:The LLM will understand your intent and call the appropriate agent command.
Displaying Agent Status
Your agent can display custom sections in Opperator’s sidebar to show status, progress, metrics, or any information you want visible.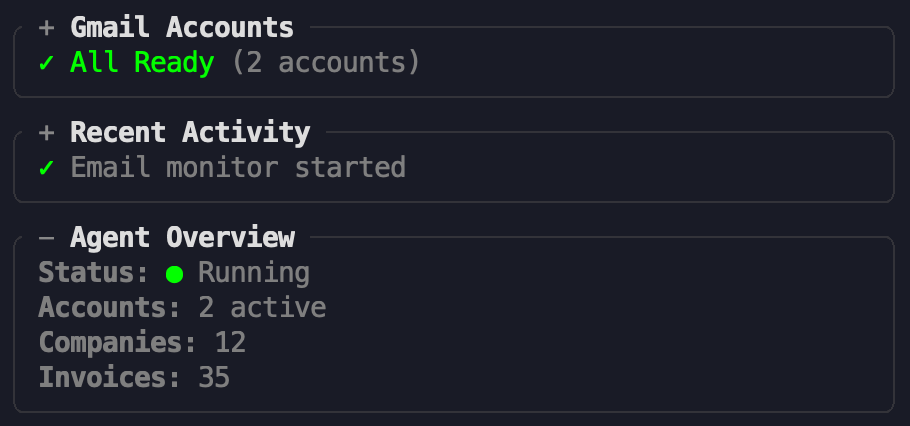
Managing Agents
Deleting an Agent
If you need to remove an agent completely, use the delete command:- The agent directory and all files
- The configuration entry in
agents.yaml - Persistent data in
agent_data.json - All logs (database and disk)
- Any async tasks associated with the agent
--force flag:
What’s Next
Now that you’ve created your first agent, dive deeper into the Opperator SDK to build more sophisticated agents:Agent Lifecycle
Learn about initialization, startup, and shutdown methods to control your agent’s behavior
Commands & Tools
Register commands and expose agent capabilities as LLM tools
System Prompts
Guide the LLM with dynamic prompts based on agent state
Custom Sidebars
Display real-time status and progress in the TUI
Reference Documentation
agents.yaml Reference
Complete agent configuration and deployment options
CLI Reference
All available CLI commands for agent management